


"Blue noise" is a term used in computer graphics to describe noise that is uniformly distributed. It is often used in procedural generation techniques to place objects during terrain generation that require a roughly even distribution across a landscape. This post will go into an implementation of Poisson Disk sampling, a super straightforward blue noise generator that I've been using on recent projects. 😄
Hint: refresh to generate more points!
See my repo for the full source code here
First off, why would we use blue noise versus normal random number generation? If we compare randomly generated points vs points generated via a blue noise function, we’d see something like the two images below.
 Random number generation, generated using Math.random()
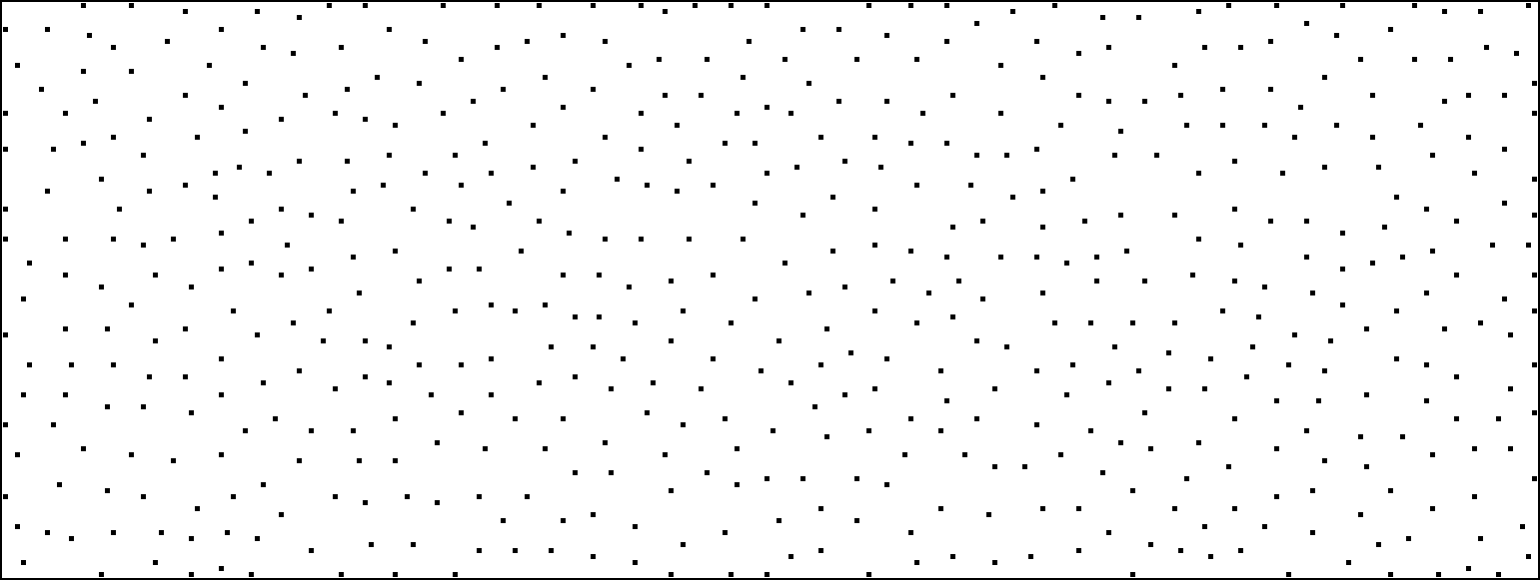 Blue noise, generated using poisson disk sampling
We can see that points generated by the blue noise are able to maintain a minimum distance from other points, creating a randomly generated yet more natural look and feel when compared to points generated by random number generation. This is no fault of the algorithm used in the random number generator, there are just no guarantees on how evenly distributed the points will be.
Poisson Disk Sampling
The blue noise example above was generated using the algorithm presented in "Fast Poisson Disk Sampling in Arbitrary Dimensions". The algorithm is linear w/ respect to the number of points generated (i.e. fast 🚀!), easy to understand, and easy to implement so let’s dive in!
Algorithm input
The poisson disk sampler requires only a couple parameters to get started.
- First we need \(n\), the domain in which the numbers will be generated (i.e. 2D space or 3D space). For the sake of simplicity, we’ll assume that all points will be generated in 2D space, setting \(n = 2\).
- The minimum distance \(r\) between samples.
- A constant \(k\), the number of samples to choose before rejection.
Converting this into rust, we'll get the the following:
1 struct PoissonDisk {
2 pub minimum_distance: usize,
3 pub num_samples: usize,
4 }
5
6 impl PoissonDisk {
7 pub fn new(r: usize, k: usize) -> Self {
8 PoissonDisk {
9 minimum_distance: r,
10 num_samples: k,
11 }
12 }
13 }
Keeping track of sampled points
As part of the initialization process, we'll need to create a grid that is used to store sampled points and to speed up spatial searches. The size of each cell in the grid is directly related to the radius \(r\) and the domain \(n\). In the case of a 2D grid for our example implementation, each cell is bounded by \(\frac{r}{\sqrt{2}}\) so that each grid cell will contain at most a single sample.
To understand why we use \(\frac{r}{\sqrt{2}}\) as the cell size, the insight lies in the fact that we want each cell to hold at most one point. So what is the longest possible distance between two points in adjacent cells? The worst case would be two points on opposite ends of the cell diagonal. Since this diagonal should never exceed \(r\), we can use some geometry to solve the length of the sides:
\begin{align} x^2 + x^2 = r^2\ 2x^2 = r^2\ x^2 = \frac{r^2}{2}\ x = \frac{r}{\sqrt{2}}\ \end{align}
Generalizing this to the domain \(n\) we see how the original formulation comes out to be \(\frac{r}{\sqrt{n}}\)!
In our rust implementation, we’ll represent the grid as a
Vec<Option<(usize, usize)>>. Each cell can either be None or the
sampled point (usize, usize). Building on the example code we had before,
the struct and new function should now look like below:
1 struct PoissonDisk {
2 ..., // fields from before
3 width: usize,
4 height: usize,
5 cell_size: f64,
6 grid_width: f64,
7 grid_height: f64,
8 grid: Vec<Option<(usize, usize)>>,
9 samples: Vec<(usize, usize)>,
10 }
11
12 impl PoissonDisk {
13 pub fn new(w: usize, h: usize, r: usize, k: usize) -> Self {
14 let cell_size = r as f64 / (2.0 as f64).sqrt();
15 let grid_width = (w as f64 / cell_size).ceil() + 1.0;
16 let grid_height = (j as f64 / cell_size).ceil() + 1.0;
17
18 PoissonDisk {
19 ...,
20 width: w,
21 height: h,
22 cell_size, grid_width, grid_height,
23 grid: vec![None; (grid_width * grid_height) as usize],
24 }
25 }
26 }
Next, we’ll create a utility function to insert new points into the grid
since it involves a bit of math each time. We need to determine which cell
in the grid to place a point, so we’ll scale the point to determine the
grid coordinates by dividing the point coordinates by the cell_size and
calculate the index into the grid array. Now every time we generate a new
point, we can simply call self.insert_point(new_point) to add the point
to the grid.
1 fn insert_point(&mut self, point: (usize, usize)) {
2 // Calculate the (x, y) coordinate when place inside the grid.
3 let cell_x = (point.0 as f64 / self.cell_size).floor();
4 let cell_y = (point.1 as f64 / self.cell_size).floor();
5 // Calculate the index within our flat array and place the point
6 // there.
7 let cell_idx = (cell_y * self.cell_width + cell_x) as usize;
8 self.grid[cell_idx] = Some(point);
9 }
Selecting an initial point
For the next step of the algorithm, we need to select an initial sample. This will be randomly chosen uniformly from the domain, inserted into the grid, and used as the initial point on the "active list".
First, let’s add the rand crate to our
dependencies in our Cargo.toml file.
[dependencies]
rand = "0.6.5"
Afterwards, modify the new function so that we generate a new point after
initializing the PoissonDisk struct, adding it to both grid and active
list.
Putting it all together with the example code that we have so far, the
new function should look a little something like below.
1 use rand;
2
3 struct PoissonDisk {
4 ...,
5 // "Active list" used to keep track of sampled points we are able
6 // to generate new points around.
7 active: Vec<(usize, usize)>
8 }
9
10 impl PoissonDisk {
11 pub fn new(w: usize, h: usize, r: usize, k: usize) -> Self {
12 // Instead of immediately returning the newly construct struct
13 // let store it in a variable and generate the initial point.
14 let disk = PoissonDisk {
15 ...,
16 active: Vec::new(),
17 };
18
19 // Here we generate the new point.
20 let rng = rand::thread_rng();
21 let point = (
22 (rng.gen::<f64>() * w as f64) as usize,
23 (rng.gen::<f64>() * h as f64) as usize
24 );
25
26 // Add point to grid & active list.
27 disk.insert_point(point);
28 disk.active.push(point);
29
30 disk
31 }
32 }
Sampling points & point validation
Finally 🎉! Now that we have the ability to keep track of points, sources for new points, and an initial sample to get started we can start implementing the core of the algorithm (Step 2 in the paper).
This step involves a loop where:
- We take a random point from the active list
- Sample \(r\) points around the active point
- If none of the points are outside \(r\) of nearby points, remove this point from the active list.
- Otherwise, add points to active list and continue.
- Repeat until there are no more points on the active list.
Breaking down the loop step by step, we'll first tackle randomly selecting a point from the active list. Given an active list of length \(l\), we randomly choose an index between \(0\) and \(l - 1\).
1 // Generate a random index in our active list.
2 let idx = rng.gen::<f64>() * (self.active.len() - 1) as f64;
3 let source = self.active[idx as usize];
Next, we need to sample \(k\) new points around the source point. When generating a new point, we randomly choose a point that is between \(r\) and \(2r\) of the source point. This will make it so that new points will always be at least \(r\) length away from the current point. To visualize how this will look on the grid we've created, here's a visualization of the disk where valid points could possible be generated.
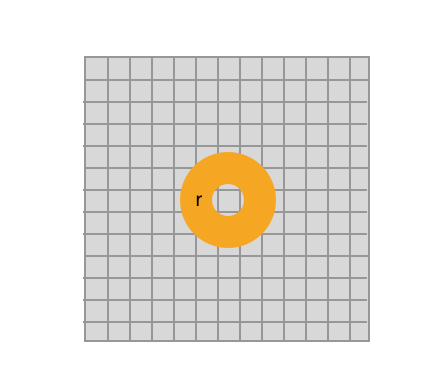 Generated points will appear in a disk that is \(r\) is size around the
source point. Notice that it overlaps approximately 2 squares away from the
source point. This will be important later on when we validate new points.
Generated points will appear in a disk that is \(r\) is size around the
source point. Notice that it overlaps approximately 2 squares away from the
source point. This will be important later on when we validate new points.
The trick to sampling a point inside this disk is to use polar coordinates! Polar coordinates are represented by a distance and angle from a reference point (see image below for an example). Using the source point as our reference point, we randomly choose an angle and a random radius that is between \(r\) and \(2r\) and convert this back into cartesian coordinates.
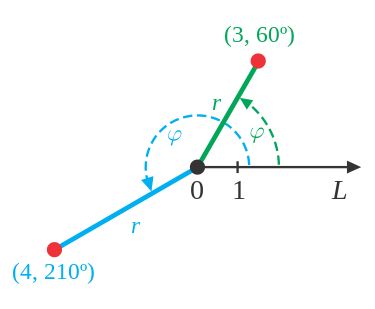 An example of polar coordinates in action courtesy of Wikipedia
Using this knowledge, lets create a new function, generate_around,
that will generate new points around the source point:
1 fn generate_around(&mut self, pt: (usize, usize)) -> (usize, usize) {
2 let mut rng = rand::thread_rng();
3 // Random angle
4 let angle = 2.0 * PI * rng.gen::<f64>();
5 // Random radius between r and 2r
6 let radius = self.min_dist as f64 * (rng.gen::<f64>() + 1.0);
7 // Convert polar coordinates to cartesian and viola,
8 // a new point is generated around the source point (x, y)
9 let new_x = pt.0 as f64 + (radius * angle.cos());
10 let new_y = pt.1 as f64 + (radius * angle.sin());
11 // Using min/max, we'll also constrain the new point to be within
12 // the bounds of our grid.
13 (
14 new_x.max(0.0).min(self.width as f64 - 1.0) as usize,
15 new_y.max(0.0).min(self.height as f64 - 1.0) as usize,
16 )
17 }
Now that we have a new point, how do make sure it's a "valid" point?
Valid new points satisfy two constraints:
- They should not be within \(r\) of any existing point.
- They must exist within the
width/heightbounds.
Note that in our generate_around function we already ensure that new points
are within our width/height bounds, so we only need to check if the point
exists within \(r\) of other points.
The grid that was shown earlier can be used to quickly search for neighboring points. Lets bring back the image we used before to showcase the disk area where sampled points will appear.
As mentioned before, each grid cell is sized in such a way that there should only exist a single point in each cell. Since each cell is a smaller than the radius (\(\frac{r}{\sqrt{2}}\)), the neighborhood around the source cell will be at most 2 cells away.
To find the start and end coordinates of the neighborhood, we'll determine where the point exists in the grid and +/- 2 from the coordinates.
// Scale the source point onto the grid.
let xidx = (point.0 as f64 / self.grid_size).floor();
let yidx = (point.1 as f64 / self.grid_size).floor();
// Determine the neighborhood around the source point.
let start_x = (xidx - 2.0).max(0.0) as usize;
let end_x = (xidx + 2.0).min(self.grid_width - 1.0) as usize;
let start_y = (yidx - 2.0).max(0.0) as usize;
let end_y = (yidx + 2.0).min(self.grid_height - 1.0) as usize;
Using the cells in this neighborhood we can loop through the neighbors of the source point and make sure our new point is outside the radius of any nearby points without having to check all points. If no neighbors are found or if we are outside the radius of each neighbor, this point is valid.
Our is_valid function should now look like the following:
fn is_valid(&self, point: (usize, usize)) -> bool {
    // Scale the source point onto the grid.
    let xidx = (point.0 as f64 / self.grid_size).floor();
    let yidx = (point.1 as f64 / self.grid_size).floor();
    // Determine the neighborhood around the source point.
    let start_x = (xidx - 2.0).max(0.0) as usize;
    let end_x = (xidx + 2.0).min(self.grid_width - 1.0) as usize;
    let start_y = (yidx - 2.0).max(0.0) as usize;
    let end_y = (yidx + 2.0).min(self.grid_height - 1.0) as usize;
    // Check all non-empty neighbors cells and make sure the new point
    // is outside their radius.
    for y in start_y..end_y {
        for x in start_x..end_x {
            let idx = y * self.grid_width as usize + x;
            if let Some(cell) = self.grid[idx] {
                // This is the standard distance formula between two points.
                if distance(cell, point) <= self.min_dist as f64 {
                    return false;
                }
            }
        }
    }

    true
}
All that is left is to make sure any source point that were unable to generate valid sample points is remove from our active list.
Putting it all together, the example code should now look like the following:
pub fn generate(&mut self) {
    let mut rng = rand::thread_rng();
    while !self.active.is_empty() {
        let idx = rng.gen::<f64>() * (self.active.len() - 1) as f64;
        let source = self.active[idx as usize];
        // Did we find an valid samples?
        let mut found = false;
        for _ in 0..self.num_samples {
            let new_point = self.generate_around(source);
            // Add the new point to the grid and active list if
            // the point is valid.
            if self.is_valid(new_point) {
                // Add point to our background grid
                self.insert_point(new_point);
                // Add point to our active list
                self.active.push(new_point);
                // Add point to our list of sampled points
                self.samples.push(new_point);
                found = true;
            }
        }
        // If not valid points are found, remove the source point
        // from the active list.
        if !found {
            self.active.remove(idx);
        }
    }
}
And there you have it! Check out the code repo to view the code in it's entirety along w/ the WASM visualization that was used for this page.